1.Remove measurement error likely to be occurred by user
2.Fast and accurate distinction
3.Reliable result through repetition
4.Wide range of application in optical video system
5.Environment-friendly
6.Correction not required.
7.Feasible to measure more than 2 kinds of coating film thickness at one time.
8.PC-compatible measuring software.
9.Automatic correction by extended magnification.
10.Low cost.
11.Easy upgrade.

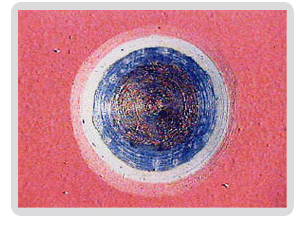
The key of the system is Borer machine, specially designed. It drills a crater-shaped hole with clean and velvety depth on paint surface in material (See figure). Its depth is feasible to adjust according to the coating and basic material.

Put the bored sample under microscope, the crater can be seen by a high-resolution monitor. You can check easily metal surface, ground coating, paint layer and other multiple coating layer, and measure the thickness of coating. This device is a standard of coating thickness measurement from ASTM D5796, and it provides much more accurate precision than magnetic field and eddy current measurement device, used most commonly, since it measures thickness of coating physically.

It also features to use quality inspection of product without any certification since it has been used as international standard device.


1. Drill a crater on coating surface using Borer bit with high precision of shallow angle.
2. The shallow crater, drilled from paint film to substrate, exposes different paint layers.
3. Various film layers from extended crater can be shown by video microscope and high-resolution monitor.
4. The image shown in screen can be magnified 400 times.
5. Actual measurement can be made by digital micrometer or PC automatic measurement application, drew a line from starting to final point by cross hair line generator.
6. The actual thickness can be yielded by dividing distance from the starting to final point by 10. (Layer width of the crater that borer bit with shallow angle made is a view that actual thickness is magnified up to 10.)